When my old Ubuntu on a laptop web and file server died I decided to set up my Mac Mini with Snow Leopard as its replacement rather than finding another old laptop and building a new Linux server on it. I was afraid setting up an Apache, MySQL and PHP stack on Mac OS X would be complicated and messy, but it turned out to be pretty straightforward thanks to some good guides on the web.
My first step was to follow this how-to from the "Coolest Guides on the Planet" website:
Install and configure Apache, MySQL & PHP on OS X Lion 10.7 and 10.6
Then I followed another guide by the same person for setting up phpMyAdmin:
Installing phpMyAdmin on Mac OSX 10.8 Mountain Lion & 10.7, 10.6
I then went ahead and imported the backup of the database for my home-brewed web apps into MySQL using phpMyAdmin, and copied my PHP files into the web server directory and tested my apps. I quickly ran into a problem where apps that had been working for years starting throwing fatal errors (sorry, I didn't write down what they were). After poking around on the web I discovered that the MySQL installer you download from Oracle has STRICT_TRANS_TABLES turned on by default, which can cause problems for apps developed on Ubuntu because STRICT_TRANS_TABLES is turned off by default in Ubuntu. I followed the directions on this blog post to turn off STRICT_TRANS_TABLES and then everything worked:
MySQL Strict Mode on OS X
After that, everything worked great.
2013-10-23
Setting up Mac OS X Snow Leopard as an Apache, MySQL, PHP (MAMP) web server
What I learned about file sharing and permissions on Mac OS X Snow Leopard when I set it up as a file server for multiple users
For years I used an old laptop running Ubuntu as a combination web server and file server. It died a few weeks ago, and rather than find another old laptop and building another Linux server I decided to just set up my existing Mac Mini with (non-Server) Snow Leopard as a file server that my wife and I could access. Because it didn't "just work" I thought I would write down what I learned in the process. I have no idea how much of this is true for later versions of Mac OS X, so your mileage may vary on later versions.
My first thought was to see if I could get it to "just work." I plugged an external drive with the family files into the Mac Mini, turned on file sharing in System Preferences - Sharing while logged in as me, and then designated the top level folder on the external drive as a shared folder, and then in the Users box in System Preferences - Sharing I gave read and write permissions to my wife and I, and no access to Everyone. I went and tested accessing the shared folder over the network as both myself and my wife, and everything seemed to work. Great! But then, just out of paranoia, I tried accessing the folder over the network without entering a username and password, and discovered that anyone on the network could not only see the folder and its files without entering a username and password, anyone on the network could modify any of the files. WTF? After a lot of research and poking around I finally figured out the following.
1. In Mac OS X Snow Leopard external drives have the property "Ignore ownership on this volume" turned on by default on the drive's Get Info screen, and when that is checked any and all users, including guest or nobody, are treated as the owner of every file and folder on that drive.
I guess this is so that if someone plugs a USB drive into a Mac with multiple user accounts then all the users on that computer can access it. Which seems reasonable enough, until you bring file sharing into the picture:
2. If you share a folder on an external drive that has "Ignore ownership on this volume" turned on then anyone on the local network can mount that folder, and read and write to every file in that folder, without entering any credentials and regardless of what permissions you set on the folder or its files.
My theory is that Mac OS X file sharing relies entirely on the basic Mac OS X permissions system to control access to folders shared using file sharing, so if the "Ignore ownership on this volume" box is checked for an external drive, and you designate a folder on that drive as a shared folder, then Mac OS X concludes that since ownership is ignored on that drive no credentials are required to read and write to files in the shared folder.
The obvious next step was to uncheck "Ignore ownership on this volume" for the external drive and try sharing the folder again, with permissions on the "Get Info" dialog for that folder set to Read & Write for myself and my wife, and No Access for everyone. The group "staff" appeared on the list, but there was no "No Access" option for staff, so I left it at "Read only." After I did this the shared folder was no longer visible to people who connected to the machine without entering credentials, so one issue was solved.
Now that I had the shared folder on the external drive locked down so only my wife and I could access it I proceeded to test reading and writing files as myself and my wife. Here is what I observed when the "Get Info" permissions for the shared folder were set to Read & Write for both my wife and myself, the staff group was set to "Read only" and the everybody group was "No access":
- I could open and modify existing files, and save new files.
- My wife could open existing files I had created, but couldn't modify them.
- My wife could save new files, but I couldn't modify any new files she created.
- Looking at Get Info for a file created by one user showed that that user had Read & Write privileges, staff had Read only, and everyone had Read only.
4. In the non-Server version of Snow Leopard the only way to set inheritable permissions for a shared folder is by setting ACL permissions using the chmod command in Terminal.
Turns out Mac OS X has two different permissions systems, POSIX (the traditional *nix permissions system) and ACL (Access Control Lists). There is no way to set inheritable permissions for a folder using POSIX, but it can be done with ACL. Here is a article about the basics of ACL:
Introduction to OS X Access Control Lists (ACLs)
sudo chmod -R +a "group:my_new_group allow list,add_file,search,add_subdirectory,delete_child,readattr,writeattr,readextattr,writeextattr,readsecurity,file_inherit,directory_inherit" /Volumes/my_external_drive/the_folder_I_want_to_share
See the chmod man page for the details on the syntax for this command. If you don't run this as sudo then ACL permissions will *not* be set on files and folder you don't own, which can lead to confusing problems for users. The -R option means recursive, so the ACL will be set on all sub-folders and files.
A file or folder can have multiple ACLs piled one on top of another, which the operating sifts through using some order of precedence. This can lead to confusing problems for users. One easy way to start fresh with ACLs on a folder is to run this command which recursively removes all ACLs in and under the folder:
sudo chmod -RN /Volumes/my_external_drive/the_folder_I_want_to_share/
Then run your chmod command to set fresh ACLs for the folder.
2013-10-20
How to find deep sky objects for newbies
I took up amateur astronomy last year, and at the beginning I had a very hard time finding deep sky objects like galaxies, globular clusters, etc with my new telescope (an Orion XT8). Now that I have figured out how to quickly navigate to faint fuzzies I thought I would write down my method for other beginners.
Here are the tools you need for my method:
- Telescope.
- A 9x (or close to it) right angle correct image finderscope (RACI) with crosshairs.
- A green laser pointer (GLP) finder (preferred) or a red dot finder
- SkySafari+ on iOS (you could use some other apps or a star chart instead).
- Turn on Night (red) mode in SkySafari+ and dim your screen so it won't ruin your night vision.
- In the SkySafari+ settings adjust what magnitude stars get displayed so that the sky shown in SkySafari+ looks looks like what you see looking up. If SkySafari+ shows a lot of stars that are too dim for you to see on the sky it will be very hard to navigate, so you have to get it matched up to what you can see.
- Look up the deep sky object in SkySafari+ and center it on the screen.

- See what constellation the deep sky object is near in Sky Safari+, and then find that constellation on the sky. Move your telescope so it is roughly pointing towards that constellation. No need to be precise yet.
- Look up at the constellation and get oriented to the stars in constellation.
- Go back to SkySafari+ and mentally make a simple shape (line, triangle, or polygon) using your deep sky object as one corner and the nearest stars as the other corners. Coming up with this shape is the key to the whole process, so find a simple pattern and commit its shape to memory. I find that for some reason it helps to mentally verbalize the pattern, i.e. mutter to yourself something like "a long skinny triangle with the deep sky object at lower corner of the base"

- Move your telescope and place your red dot or laser beam so that it makes the same simple shape on the sky. Look back and forth between SkySafari+ and the sky and tweak your telescope position until the proportions and angles of your simple shape match between the sky and SkySafari+. The key to this technique is that your brain is naturally good at recognizing when two shapes look the same, so go back and forth until the match looks as good as you can get it.

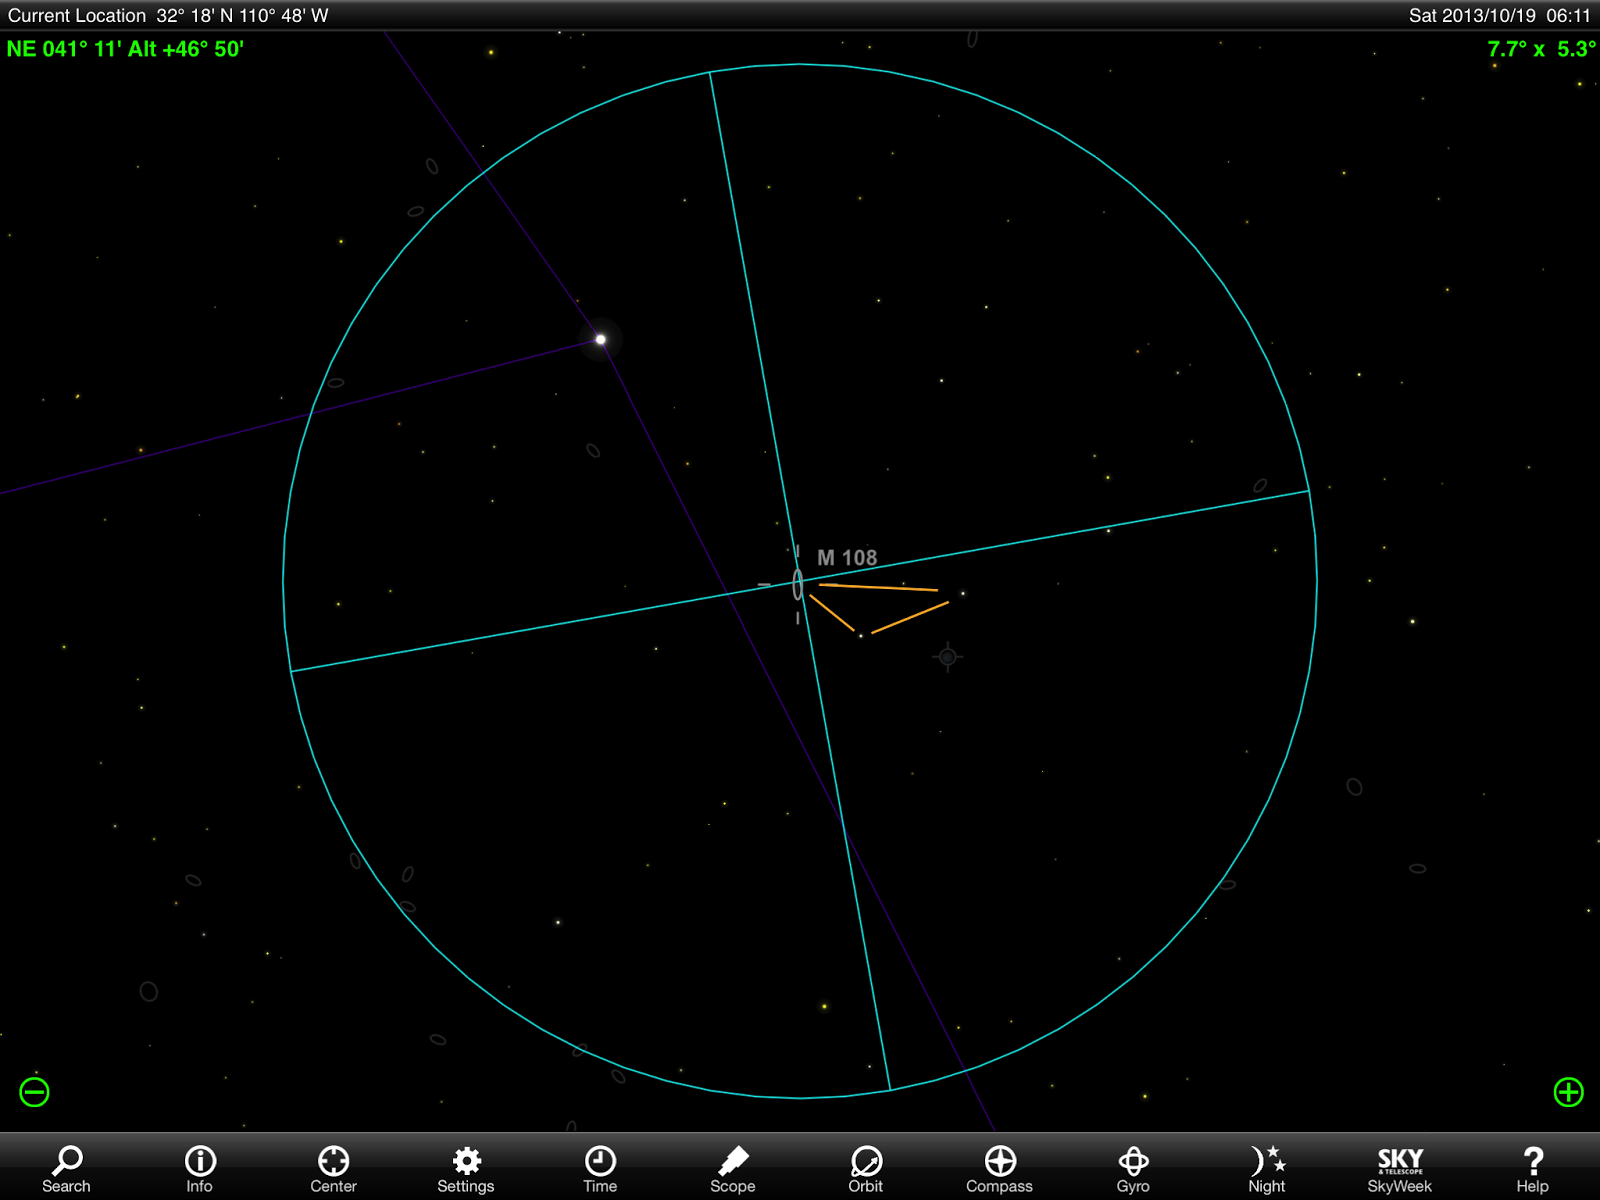
- Once you have the telescope positioned so that your red dot or laser beam makes the same shape with surrounding stars go back to SkySafari+ and turn on the 5 degree crosshairs:
- Tap the upper right hand corner of the screen. This will open up a dialog that looks like this:
- Tap the "Rings" button under 5 degrees. This will place a 5 degree wide crosshair on the screen.
- Tap anywhere on the screen to exit the dialog.
- Center the crosshair on your deep sky object in SkySafari+, and then zoom in until the edges of the crosshair touch the edge of the screen. Now SkySafari+ is more or less displaying what you should see looking through your right angle correct image finder scope (plus or minus a degree or two).


- Now that you have your finder scope in the right area you need to get oriented to the stars visible in the finder scope. Look back and forth between your finder scope and SkySafari+ looking for single stars and/or simple patterns of brighter stars (like triangles, lines, or simple polygons) that you can find in both views. Don't worry about the deep sky object for the moment, just look for one or more star patterns you can find in both views. Be patient if at first you don't find any matching patterns and resist the temptation to move the telescope to look around; it often takes a few looks back and forth for a pattern to jump out at you. In this case there is a single very bright star that can be used as one calibration point, and two distinctive triangles of stars that can be used as others:

- Once you have identified one star or star pattern you can see in both SkySafari+ and your finder scope tweak the position of your telescope until that patterns sit in the same relative position in both your finder scope view and SkySafari+ crosshairs, i.e. if the pattern is near the edge in the upper left in SkySafari+, move the telescope so it is near the edge in the upper left in the finder scope.
- Now that you have your finder scope view more or less synced with your SkySafari+ view, repeat the earlier process of making a simple mental shape (triangle, line, etc) using your deep sky object and nearby stars in SkySafari+. Once again, coming up with the mental shape is key, and it may help to verbalize the shape under your breath.
- Move your telescope to make the same simple pattern with the finder scope crosshairs standing in for the faint fuzzy.
- Look through the telescope eyepiece; your deep sky object should be visible. Globular clusters and open clusters should be pretty easy to spot. Many galaxies and nebulas are very faint and look like almost invisible wisps of milkiness. Don't expect to see bold color images like you see in pictures.
- M108 in Sky Safari:

- What M108 might look like through the eyepiece:
